Toyota Camry: Child restraint system fixed with a seat belt
A child restraint system for a small child or baby must itself be properly restrained on the seat with the lap portion of the lap/shoulder belt.
◆ Installing child restraint system using a seat belt (child restraint lock function belt)
Install the child restraint system in accordance to the operation manual enclosed with the child restraint system.
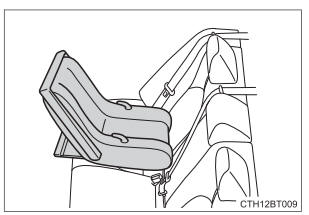
■ Rear-facing - Infant seat/convertible seat
1. Place the child restraint system on the rear seat facing the rear of the vehicle.
2. Run the seat belt through the child restraint system and insert the plate into the buckle. Make sure that the belt is not twisted.
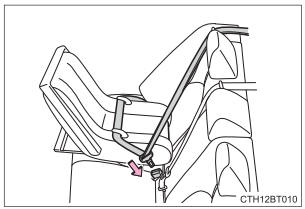
3. Fully extend the shoulder belt and allow it to retract to put it in lock mode. In lock mode, the belt cannot be extended.
4. While pushing the child restraint system down into the rear seat, allow the shoulder belt to retract until the child restraint system is securely in place.
After the shoulder belt has retracted to a point where there is no slack in the belt, pull the belt to check that it cannot be extended.
5. After installing the child restraint system, rock it back and forth to ensure that it is installed securely.
■ Forward-facing - Convertible seat
1. When using the front passenger seat: Adjust the seatback If installing the child restraint system to the front passenger seat is unavoidable, refer to P. 60 for the front passenger seat adjustment.
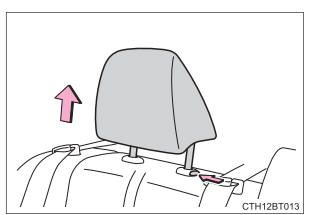
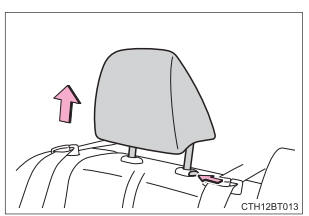
2. If the head restraint interferes with the child restraint system installation and the head restraint can be removed, remove the head restraint.
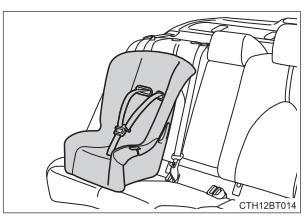
3. Place the child restraint system on the seat facing the front of the vehicle.
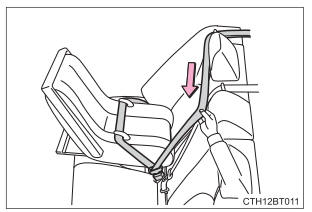
4. Run the seat belt through the child restraint system and insert the plate into the buckle. Make sure that the belt is not twisted.
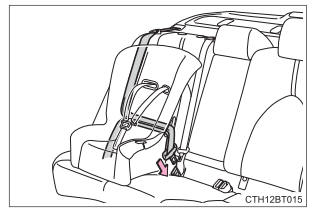
5. Fully extend the shoulder belt and allow it to retract to put it in lock mode. In lock mode, the belt cannot be extended.
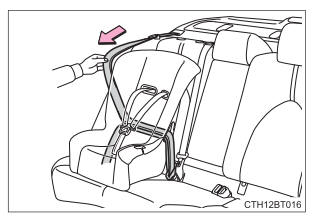
6. While pushing the child restraint system into the rear seat, allow the shoulder belt to retract until the child restraint system is securely in place.
After the shoulder belt has retracted to a point where there is no slack in the belt, pull the belt to check that it cannot be extended.
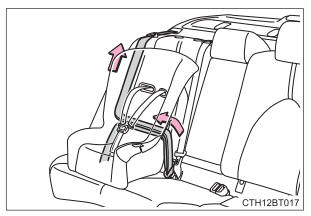
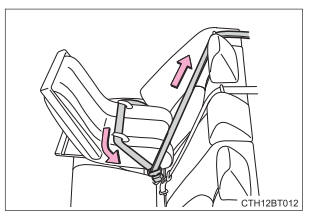
7. If the child restraint has a top tether strap, follow the child restraint manufacturer's operation manual regarding the installation, using the top tether strap to latch onto the top tether strap anchor.
8. After installing the child restraint system, rock it back and forth to ensure that it is installed securely.
■ Booster seat
1. If installing the child restraint system to the front passenger seat is unavoidable, refer to P. 60 for the front passenger seat adjustment.
2. High back type: If the head restraint interferes with your child restraint system, and the head restraint can be removed, remove the head restraint.
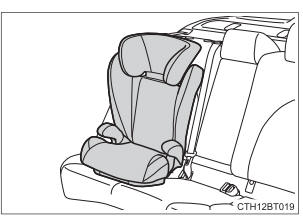
3. Place the child restraint system on the seat facing the front of the vehicle.
Booster type

High back type
4. Sit the child in the child restraint system. Fit the seat belt to the child restraint system according to the manufacturer's instructions and insert the plate into the buckle. Make sure that the belt is not twisted.
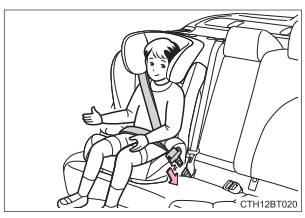
Check that the shoulder belt is correctly positioned over the child's shoulder and that the lap belt is as low as possible.
◆ Removing a child restraint system installed with a seat belt
Press the buckle release button and fully retract the seat belt.
When releasing the buckle, the child restraint system may spring up due to the rebound of the seat cushion. Release the buckle while holding down the child restraint system.
Since the seat belt automatically reels itself, slowly return it to the stowing position.
WARNING
■When installing a child restraint system
Observe the following precautions.
Failure to do so may result in death or serious injury.
- Do not allow children to play with the seat belt. If the seat belt
becomes
twisted around a child's neck, it may lead to choking or other serious
injuries
that could result in death.
If this occurs and the buckle cannot be unfastened, scissors should be used to cut the belt.
- Ensure that the belt and plate are securely locked and the seat belt is not twisted.
- Shake the child restraint system left and right, and forward and backward to ensure that it has been securely installed.
- After securing a child restraint system, never adjust the seat.
- When a booster seat is installed, always ensure that the shoulder belt is positioned across the center of the child's shoulder. The belt should be kept away from the child's neck, but not so that it could fall off the child's shoulder.
- Follow all installation instructions provided by the child restraint system manufacturer.
- When securing some types of child restraint systems in rear seats, it may not be possible to properly use the seat belts in positions next to the child restraint without interfering with it or affecting seat belt effectiveness. Be sure your seat belt fits snugly across your shoulder and low on your hips. If it does not, or if it interferes with the child restraint, move to a different position. Failure to do so may result in death or serious injury.
■When installing a booster seat
To prevent the belt from going into ALR lock mode, do not fully extend the shoulder belt. ALR mode causes the belt to tighten only. This could cause injury or discomfort to the child.
■Do not use a seat belt extender
If a seat belt extender is used when installing a child restraint system, the seat belt will not securely hold the child restraint system, which could cause death or serious injury to the child or other passengers in the event of sudden braking, sudden swerving or an accident.
READ NEXT:
 Child restraint system fixed with a child restraint LATCH anchor
■ Child restraint LATCH anchors
LATCH anchors are provided
for the outboard rear seats.
(Marks displaying the location
of the anchors are attached to
the seats.)
■ When installing in the
Using an anchor bracket (for top tether strap)
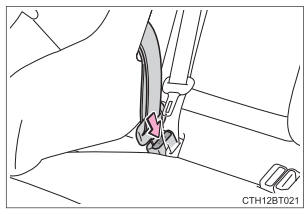
■ Anchor brackets (for top tether strap)
Anchor brackets are provided for each rear seat.
Use anchor brackets when fixing the top tether strap.
Seats with an adjustable type head restraint
S
SEE MORE:
Confirm Cellular Phone Functionality
PROCEDURE
1. CHECK CUSTOMER'S CELLULAR PHONE COMPATIBILITY
(a) Check if the cellular phone is compatible (Refer to http://www.toyota.com/Entune/).
Result Proceed to
Cellular phone is compatible.
A Cellular phone is not compatible.
B HINT: It is impo
Steering Pad Switch Circuit
DESCRIPTION This circuit sends an operation signal from the steering pad switch assembly to the radio and display receiver assembly.
If there is an open in the circuit, the audio system cannot be operated using the steering pad switch assembly.
If there is a short in the circuit, the same condit
