Nissan Sentra Service Manual: Rear air spoiler
Removal and installation
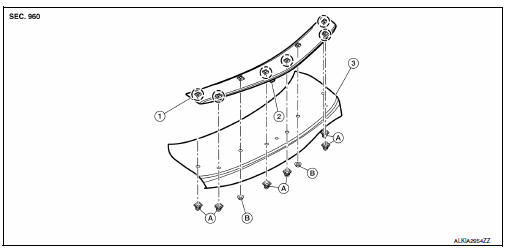
- Rear air spoiler
- High mounted stop lamp connector (if equipped)
- Trunk lid
- Grommet
- Nut
 Front
Front
Removal
- Remove trunk lid finisher. Refer to INT-45, "Removal and Installation".
- Disconnect the harness connector from the high mounted stop lamp (if equipped).
- Remove the rear air spoiler nuts.
- Carefully release and lift the rear air spoiler from the gaskets using a suitable tool.
- Carefully pry upward to release the foam tape (gasket) from trunk lid surface, using a suitable tool.
CAUTION:
Use care not to damage painted surfaces during removal or releasing of adhesive backed foam tapes.
- Release the high mounted stop lamp connector and grommet (if equipped) from trunk lid, then remove rear air spoiler.
Installation
Installation is in the reverse order of removal.
NOTE:
- Before installing, be sure there are no gaps or waves in the foam tape (gasket) where the surfaces meet.
- During installation, be sure grommet of high mounted stop lamp harness is fully seated into trunk lid opening prior to final rear air spoiler placement.
- Before installing rear air spoiler, clean the surface where it will be mounted with isopropyl alcohol or equivalent to degrease the surface.
CAUTION:
Some plastic surfaces may become damaged if contacted by alcohol. Cover and protect the rear combination lamp assemblies. If alcohol does come into contact with the lenses, immediately wash the surface with water.
 License lamp finisher
Exploded view
Rear view camera
Trunk lid opener request switch
License lamp finisher
Clip
Pawl
Removal and installation
Remove trunk lid finisher. Refer to INT-45, "Removal ...
 Body repair
...
Other materials:
Removal and installation
BCM
Removal and installation
Note:
Before replacing BCM, perform “READ CONFIGURATION” to save or print
current vehicle specification. Refer
to BCS-61, "CONFIGURATION (BCM) : Description".
Removal
Disconnect the negative battery terminal. Refer to pg-52, "removal a ...
Rear drum brake
BRAKE CALIPER ASSEMBLY : Exploded View
Shoe hold pin
Back plate
Plug
Brake shoe
Spring
Upper spring
Adjuster
Return spring
Brake drum
Boot
Piston
Piston cup
Spring
Wheel cylinder
Bleeder valve
Cap
Apply rubber grease
Apply PBC (Poly Butyl Cuprysil)
gr ...
G Sensor
Exploded View
G sensor
Bracket
Vehicle front
NВ·m (kg-m, ft-lb)
NВ·m (kg-m, in-lb)
Removal and Installation
WARNING:
Do not leave any objects (screwdrivers, tools, etc.) on the seat during
seat repair. It can lead to personal
injury if the side air bag module should acc ...
