Nissan Sentra Service Manual: Precaution for Liquid Gasket
REMOVAL OF LIQUID GASKET
- After removing nuts and bolts, separate the mating surface, using Tool and remove old liquid gasket.
Tool number : KV10111100 (J-37228)
CAUTION:
Be careful not to damage the mating surfaces.
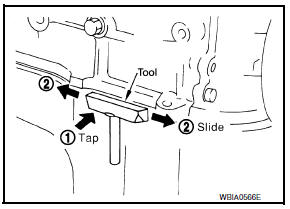
- Tap (1) Tool to insert it, and then slide it (2) by tapping on the side as shown.
- In areas where Tool is difficult to use, use plastic hammer to lightly tap the parts, to remove it.
CAUTION:
Do not damage the mating surfaces.
Liquid gasket application procedure
Do not damage the mating surfaces.
- Remove old liquid gasket adhering to the liquid gasket application surface and the mating surface, using scraper.
- Remove liquid gasket completely from the groove of the liquid gasket application surface, bolts, and bolt holes.
- Thoroughly clean the mating surfaces and remove adhering moisture, grease and foreign materials.
- Attach liquid gasket tube using suitable tool.
Use genuine rtv silicone sealant or equivalent. Refer to gi-21, "recommended chemical products and sealants".
- Apply liquid gasket without breaks to the specified location with the specified dimensions.
- If there is a groove for the liquid gasket application, apply liquid gasket to the groove.
- As for the bolt holes, normally apply liquid gasket inside the
holes. Occasionally, it should be applied outside the holes.
Make sure to read the text of service manual.
- Within five minutes of liquid gasket application, install the mating component.
- If liquid gasket protrudes, wipe it off immediately
- Do not retighten nuts or bolts after the installation.
- After 30 minutes or more have passed from the installation, fill engine oil and engine coolant.
Caution:
If there are more specific instructions in the procedures contained in this manual concerning liquid gasket application, observe them.
 Precaution for Supplemental Restraint System (SRS) "AIR BAG" and "SEAT
BELT PRE-TENSIONER"
Precaution for Supplemental Restraint System (SRS) "AIR BAG" and "SEAT
BELT PRE-TENSIONER"
The Supplemental Restraint System such as “AIR BAG” and “SEAT BELT PRE-TENSIONER”,
used along
with a front seat belt, helps to reduce the risk or severity of injury to the
dri ...
 Preparation
Special Service Tools
The actual shape of the tools may differ from those illustrated here.
Commercial Service Tools
...
Other materials:
System description
Component parts
Component parts location
Front tweeter lh
GPS antenna
Steering switches
Av control unit
Front tweeter rh
Microphone
Front door speaker LH
Front door speaker rh
Rear speaker RH
Rear speaker lh
Antenna amp.
Satellite antenna
Rear view camera
Window a ...
Precaution for Supplemental Restraint System (SRS) "AIR BAG" and "SEAT BELT
PRE-TENSIONER"
The Supplemental Restraint System such as “AIR BAG” and “SEAT BELT PRE-TENSIONER”,
used along
with a front seat belt, helps to reduce the risk or severity of injury to the
driver and front passenger for certain
types of collision. Information necessary to service the system ...
Unit disassembly and assembly
TORQUE CONVERTER AND CONVERTER HOUSING OIL SEAL
Exploded View
Transaxle assembly
Torque converter
Converter housing oil seal
: Apply CVT Fluid
Disassembly
Remove transaxle assembly.
Remove torque converter.
CAUTION:
Do not damage the bushing on the inside of torque con ...
