Nissan Sentra Service Manual: Parking brake control
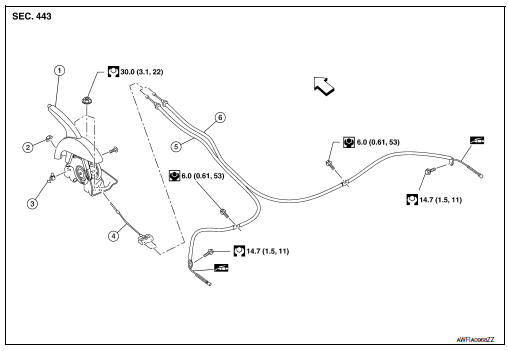
Exploded View
-
Parking brake lever assembly
-
Adjusting nut
-
Parking brake switch
-
Front parking brake cable
-
Rear parking brake cable (LH)
-
Rear parking brake cable (RH)
 Front
Front
Removal and Installation
REMOVAL
Parking Brake Control
-
Remove rear wheels and tires using power tool. Refer to WT-47, "Adjustment".
-
Remove the center console assembly. Refer to IP-14, "Removal and Installation".
-
Disconnect the parking brake switch harness connector.
-
Remove adjusting nut and loosen front parking brake cable.
-
Remove the parking brake lever assembly.
Rear Parking Brake Cable
-
Pull equalizer (A) of the front parking brake cable (1) in a rearward direction and then push upward to remove each rear parking brake cable (2)
-
Remove sub muffler and heat plate. Refer to EX-5, "Removal and Installation".
-
Remove rear parking brake cable from toggle lever. Refer to BR-42, "Exploded View" (drum brake) or PB- 9, "Exploded View - Disc Brake" (disc brake).
-
Remove rear parking brake cable bolts.
-
Press the pawl (1) to remove each rear parking brake cable from the vehicle.
INSTALLATION
Installation is in the reverse order of removal.
CAUTION:
Do not reuse adjusting nut.
-
Perform adjustment after installation. Refer to PB-4, "Inspection and Adjustment".
Adjustment
ADJUSTMENT AFTER INSTALLATION
Adjust the parking brake lever stroke. Refer to PB-4, "Inspection and Adjustment".

 Parking brake shoe
Removal and Installation - Drum Brake
If equipped with drum brakes, refer to BR-42, "Removal and
Installation".
Exploded View - Disc Brake
Anti-rattle pin
Back plate
...
Other materials:
CONSULT Data Link Connector (DLC) Circuit
Inspection procedure
If the CONSULT cannot diagnose the system properly, check the following
items.
Symptom
Check item
CONSULT cannot access any
system.
CONSULT DLC power supply circuit (Terminal 8 and 16) and ground
circuit (Terminal 4 and 5)
...
Recommended chemical products and sealants
Refer to the following chart for help in selecting the appropriate chemical
product or sealant.
Product Description
Purpose
Nissan North America
Part No. (USA)
Nissan Canada Part
No. (Canada)
Aftermarket Crossreference
Part Nos.
1
Rear View Mirror ...
Ignition timing
Inspection
1.CHECK IGNITION TIMING
Attach timing light to the ignition coil No.1 harness.
Check ignition timing.
: Timing indicator
Specification : EC-486, "Ignition Timing"
>> INSPECTION END
...
