Nissan Sentra Service Manual: Floor trim
Exploded View
- Floor trim
- Harness protector
- Front floor spacer (RH)
- Front floor spacer (LH)
- Rear floor spacer (LH)
- Rear floor spacer (RH)
- Column hole cover
 Pawl
Pawl
 Front
Front
Removal and Installation
REMOVAL
- Remove front seat assemblies. Refer to the following.
- Refer to SE-18, "DRIVER SIDE : Removal and Installation - Seat Assembly" (Driver Seat).
- Refer to SE-20, "PASSENGER SIDE : Removal and Installation - Seat Assembly" (Passenger Seat).
- Remove rear seat cushion assembly. Refer to SE-23, "Removal and Installation - Seat Cushion Assembly".
- Remove dash side finishers (LH/RH). Refer to INT-26, "DASH SIDE FINISHER : Removal and Installation".
- Remove center pillar lower finishers (LH/RH). Refer to INT-27, "CENTER PILLAR LOWER FINISHER : Removal and Installation".
- Remove rear pillar lower finishers (LH/RH). Refer to INT-30, "REAR PILLAR FINISHER : Removal and Installation - Rear Pillar Lower Finisher".
- Remove lap pre-tensioner anchor bolt. Refer to SB-8, "Removal and Installation".
- Remove center console assembly. Refer to IP-17, "Removal and Installation".
- Remove console rear bracket. Refer to IP-17, "Exploded View".
- Remove rear floor duct. Refer to VTL-7, "REAR FLOOR DUCT : Removal and Installation - Rear Floor Duct".
- Remove shift selector assembly. Refer to TM-253, "Removal and Installation".
- Remove diagnosis sensor unit. Refer to SR-28, "Removal and Installation".
- Remove parking brake lever assembly. Refer to PB-7, "Removal and Installation".
- Remove nut (A) and then remove instrument stay.
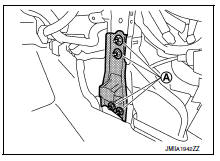
- Disconnect drain hose.

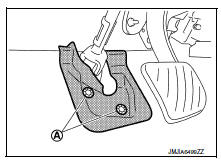
- Remove clips (A) and the column hole cover.
- Release pawl using a suitable tool (A) and open the harness protector.
 Pawl
Pawl
- Remove floor trim.
INSTALLATION
Installation is in the reverse order of removal.
 Rear parcel shelf finisher
Exploded View
Seat belt finisher (RH)
Rear parcel shelf finisher
Rear seatback finisher (RH)
Top tether strap anchor finisher
(RH)
Top tether strap anchor finisher
(center)
Rear ...
 Headlining
Exploded View
STANDARD ROOF
Headlining
Assist grip
Map lamp bracket
Sun visor (RH)
Sun visor cover
Sun visor holder
Map lamp
Sun visor (LH)
Interior room lamp
Assist grip cap ...
Other materials:
B142X Collision detection
Description
DTC B142X COLLISION DETECTION
The air bag diagnosis sensor unit will set this DTC if it has detected a
collision which has resulted in a deployment
of one or more air bags or pre-tensioners. If this DTC is detected after a SRS
repair, the air bag diagnosis
sensor unit has not yet ...
P1225 TP Sensor
DTC Logic
DTC DETECTION LOGIC
DTC No.
CONSULT screen terms
(Trouble diagnosis content)
DTC detecting condition
Possible cause
P1225
CTP LEARNING-B1
(Closed throttle position
learning bank 1)
Closed throttle position learning value is excessively
low.
E ...
Front fog lamp
Aiming adjustment
PREPARATION BEFORE ADJUSTING
The fog lamp is a semi-sealed beam type which uses a replaceable halogen
bulb. Before performing aiming
adjustment procedure, check the following:
Ensure all tires are inflated to correct pressure.
Place vehicle and screen on level surface.
...
