Nissan Sentra Service Manual: Basic inspection
Diagnosis and repair work flow
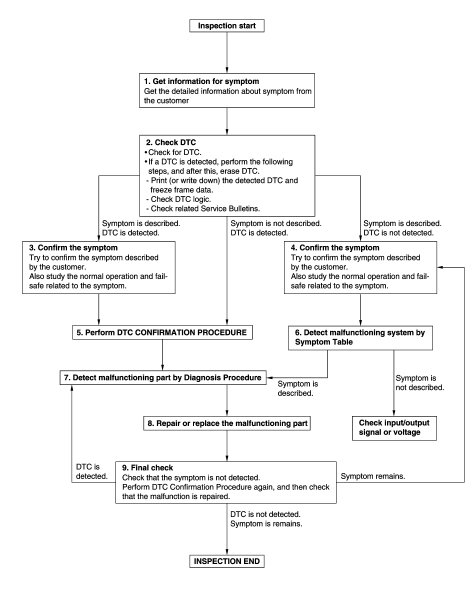
Work flow
Overall sequence
Detailed flow
1.Get information for symptom
Get the detailed information from the customer about the symptom (the condition and the environment when the incident/malfunction occurred) using the “diagnostic work sheet”. (Refer to ec-129, "diagnostic work sheet".) >> Go to 2.
2.Check dtc in ecm
- Check dtc in ecm.
- If a dtc is detected, perform the following steps, and after this, erase dtc.
- Print (or write down) the detected dtc and freeze frame data.
- Check dtc logic.
- Study the relationship between the cause detected by dtc and the symptom described by the customer.
- Check related service bulletins.
Are any symptoms described and any DTCs detected? Symptom is described, DTC is detected>>GO TO 3.
Symptom is described, DTC is not detected>>GO TO 4.
Symptom is not described, DTC is detected>>GO TO 5.
3.Confirm the symptom
Try to confirm the symptom described by the customer.
Also study the normal operation and fail-safe related to the symptom. Refer to ec-473, "symptom table" and ec-90, "fail safe".
Diagnosis work sheet is useful to verify the incident.
Verify relation between the symptom and the condition when the symptom is detected.
>> Go to 5.
4.Confirm the symptom
Try to confirm the symptom described by the customer.
Verify relation between the symptom and the condition when the symptom is detected.
>> Go to 6.
5.Perform dtc confirmation procedure
Perform dtc confirmation procedure for the displayed dtc, and then check that dtc is detected again.
If two or more dtcs are detected, refer to ec-93, "dtc inspection priority chart" and determine trouble diagnosis order.
Note:
- Freeze frame data is useful if the dtc is not detected.
- Perform Component Function Check if DTC CONFIRMATION PROCEDURE is not
included on Service
Manual. This simplified check procedure is an effective alternative though
DTC cannot be detected during
this check.
If the result of Component Function Check is NG, it is the same as the detection of DTC by DTC CONFIRMATION PROCEDURE.
Is DTC detected? YES >> GO TO 7.
NO >> Check ECO mode system. Refer to DMS-20, "Component Function Check".
6.Detect malfunctioning part by symptom diagnosis
Detect malfunctioning system according to Symptom Diagnosis based on the confirmed symptom in step 4, and determine the trouble diagnosis order based on possible causes and symptoms.
Is the symptom described? YES >> GO TO 7.
NO >> Monitor input data from related sensors or check voltage of related ECM terminals using CONSULT.
Refer to EC-77, "Reference Value".
7.Detect malfunctioning part by diagnosis procedure
Inspect according to Diagnosis Procedure of the system.
Is a malfunctioning part detected? YES >> GO TO 8.
NO >> Check intermittent incident. Refer to GI-39, "Intermittent Incident".
8.Repair or replace the malfunctioning part
- Repair or replace the malfunctioning part.
- Reconnect parts or connectors disconnected during diagnosis procedure again after repair and replacement.
- Check dtc. If dtc is displayed, erase it.
>> Go to 9.
9.Final check
When DTC was detected in step 3, perform DTC CONFIRMATION PROCEDURE or Component Function Check again, and then check that the malfunction have been completely repaired.
When symptom was described from the customer, refer to confirmed symptom in step 4 or 5, and check that the symptom is not detected.
Is DTC detected and does symptom remain? YES-1 >> DTC is detected: GO TO 7.
YES-2 >> Symptom remains: GO TO 4.
NO >> Before returning the vehicle to the customer, always erase DTC.
 Wiring diagram
Eco mode system
Wiring Diagram
...
 Dtc/circuit diagnosis
Eco mode switch
Component function check
1. Check eco mode switch operation
Turn ignition switch on.
Check ECO mode indicator lamp turns ON/OFF on combination meter when
turn ECO mode switc ...
Other materials:
Rear drum brake
Exploded View
Cap
Bleeder valve
Piston
Spring
Boot
Piston cup
Wheel cylinder
Apply rubber grease
Apply PBC (Poly Butyl Cuprysil)
grease or silicone-based grease
Apply brake fluid
Disassembly and Assembly
DISASSEMBLY
Remove the boot from wheel cylinder. Refer t ...
Changing engine coolant
A NISSAN dealer can change the engine coolant.
The service procedure can be found in the
NISSAN Service Manual.
Improper servicing can result in reduced
heater performance and engine overheating.
WARNING
To avoid the danger of being scalded,
never change the coolant when the ...
Cluster lid A
Removal and Installation
REMOVAL
Release cluster lid A clips and pawls using a suitable tool.
: Pawl
Metal clip
Remove cluster lid A.
INSTALLATION
Installation is in the reverse order of removal. ...
